Showing posts with label tips. Show all posts

Thursday, March 4, 2010

Getting Parents Involved in School Gardens

Parents can be a vital asset to the success of your school garden.  I was recently asked how to involve parents in a school garden project and thought I would share a few suggestions. 

Feel free to add your own thoughts and suggestions in the comment section below.

  • Have parents donate gardening tools. Parents may have extra tools lying around that they don’t need. Donations save money instead of having to buy new tools. Parents can put their names on tools and pick them up after the gardening season is over.  By donating tools, parents will feel more invested in the project.

  • Invite parents to help plant/care for/harvest the garden. Create a volunteer schedule. Send information home in a letter or newsletter; provide specific tasks so parents know how to get involved.

  • Host a garden party.  It can be a planting/harvesting party where everyone works in the garden.  Or simply invite parents to tour the garden.  Students can show the parents around and tell them what they have learned.  Again, seeing the children get excited may encourage parents to pitch in.

  • Invite parents to plan the garden. Involve them in the process early on to make them feel invested.

  • Allow students to take fresh produce home. It may get parents more excited about the garden.

  • Invite a parent to come in and cook with produce from the garden.

  • Invite a parent to come in and read a children’s book about gardening.  Click here for a list of recommended books.

  • If a parent is a gardener, have the students interview him/her and ask for advice/tips for their garden.   

  • Don't forget about your PTA/PTO organization, which can be a great resource for funding ideas or volunteers!

Monday, March 1, 2010

March School Garden Ideas

At the beginning of each month, the Got Dirt? WI blog will feature a variety of month-specific ways to incorporate your school garden into your classroom.

It's the beginning of March, which means spring is on its way! Below are some suggestions for incorporating a garden into your classroom for the month of March.

  • March 1-May 3: The Great American Cleanup--A time to beautify parks and recreation areas, plant trees and flowers, and pick up litter.  Take this time to clean up your local park or start to prepare your outdoor garden for planting.

  • March 11: Johnny Appleseed Day--Read a story about Johnny Appleseed and have an apple-themed day.  Taste different types of apples, discuss how apples grow, and make apple art!

  • March 17: St. Patrick's Day--You may have heard of a fairy garden, but why not create a leprechaun garden!  Think miniature! Have children imagine the leprechauns in the garden and write a story about their mischievous ways!

  • March 20: National Agriculture Day--Discuss Agriculture in Wisconsin.  Invite a farmer or gardener to visit your class.  Have students eat food made in Wisconsin.  Discuss all of the ways that agriculture impacts us daily.

  • March 26: Make Up Your Own Holiday Day--Have students brainstorm ideas for a new holiday and what they would do to celebrate it.  Get creative and use it as a day to celebrate your garden!

  • March 30: Take a Walk in the Park Day--Go for a walk and identify different types of plants.  Identify trees and their plant parts.  Walk through your garden and have students plan what they want to plant.
Do you have ideas on how to incorporate a garden into the classroom? We'd love to hear your ideas! Share below!

Monday, January 25, 2010

Winter Sowing

Last week at our Got Dirt? training in Green Bay, local teachers and child care providers shared resources and gardening tips.


One particularly intriguing winter gardening method was the idea of winter sowing. Winter sowing involves reusing plastic containers (such as take-out containers or milk jugs) to essentially create mini-greenhouses in the winter. Placing the containers outdoors, the seeds begin to grow naturally, taking hints from Mother Nature. Once spring arrives, the plants are ready to be transplanted into your garden.

Winter sowing offers an alternative to starting plants indoors under grow lights.

It also makes for a great method to try with your students. Just imagine students’ fascination with their mini-greenhouses outside in the snow. Each day they can monitor the progress of their plants during recess or before/after school.

Visit the website http://www.wintersown.org/ for detailed instructions, ideas and inspiration.

If you have used winter sowing in the past or decide to try it with your students, we would love to hear your thoughts and experiences!

Wednesday, January 20, 2010

Great School Garden Article and Resource List

Civil Eats, an organization that "promotes critical thought about sustainable agriculture and food systems as part of building economically and socially just communities," wrote a fantastic blog post about school gardens.


The blog post features stories of various school gardens throughout the country and an impressive list of additional resources. The resources include nonprofit organizations working to start school gardens, organizations creating curriculum and lesson plans for gardens, and funding opportunities.

The blog post shows the variety of ways to incorporate a garden into the classroom and the array of ways to approach it. Best of all, the blog post is inspirational and shows that it is possible to have a successful school garden.

Click here to check it out!

Tuesday, January 19, 2010

Create Your Own Raised Bed Garden

Learn how to create your own raised bed garden with these simple steps. 

A raised bed improves soil drainage, allowing for plant roots to breathe better.  The soil in a raised bed will also heat up faster in the spring, and the soil will not be compacted since you don't walk on your raised bed.

It's never to early to start planning your spring garden and getting everything ready!

Friday, December 4, 2009

"Grab and Go" Gardening Related Worksheets

Looking for some easy "Grab and Go" gardening-related worksheets for your students?

Visit the "Teaching Tools" section of http://www.gotdirtwisconsin.org for some new, quick and easy worksheets, including:
  • A-Maze-ing Plant Parts
  • Food Find
  • Word Scramble

Do you have suggestions for more "Grab and Go" worksheets or activities? What types of worksheets or activities would you like to see? Let us know!

Thursday, October 29, 2009

Planting a Microfarm!

Today, I planted my very first microfarm!

What's a microfarm, you ask?
A microfarm is essentially a garden on a wagon. Trays of microgreens are planted and placed on the wagon, which has a lights to help the plants grow indoors.

Microfarms offer a solution to Wisconsin's short growing season and provide flexibility for teachers. Teachers are not limited by unpredictable weather. Instead they can decide when they want to plant the microgreens and create an entire gardening unit. Plus, the microgreens start to grow relatively quickly, which will help keep the interest of students.

Planting a microfarm is surprisingly easy.

Granted, when I planted by my mircofarm, the actual cart was already built. But the planting took no time at all.

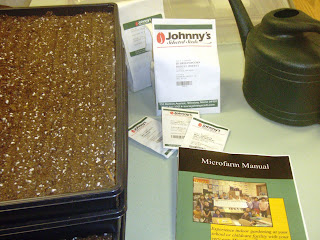
First, I gathered all of my tools (seen in the picture below).

(From the left: Trays filled with soilless potting medium, seeds, microfarm manual, and watering can)

The trays I used came with soilless potting medium already in it, which helped reduce the mess.

Once I scattered the seeds over the potting medium, I was concerned about covering them. I had a feeling I was about to make a huge mess and potting medium and seeds would be everywhere.

Here's an insiders tip: Use a pencil to help till the potting medium and to cover the seeds. Simply put a pencil into the medium and move it back and forth. It will help cover the seeds without making a mess. It is also something easy for kids to do!

I did this with four types of seeds, making a tray for each one.--See picture below


Don't forget to label your trays so you remember what you are actually growing in each tray.

Next I watered my trays of microgreens. I wasn't quite sure how much water to add since the potting medium seemed to soak it up relatively quickly. But I applied enough water to make it moist.

Then, I placed the trays onto the microfarm and covered them with plastic domes. The domes help to keep the moisture in so that you don't have to water the plants very often. Moisture will start to gather on the plastic domes, which indicates that I gave my microgreens enough water. The domes will stay on until the microgreens begin to grow.

Finally, I set the timer for the grow lights to be on for 16 hours and off for 8 hours.

Check out the finished product!


Now, its time to sit back and wait for my microgreens to start to sprout up.

I'll hopefully be able to report my success within a few days!
If you want to learn more, visit http://www.gotdirtwisconsin.org/ for a microfarm manual.

Thursday, October 22, 2009

Resource: School Garden Planning Guide

School Garden Wizard is a wonderful website that provides a step-by-step guide to planning a school garden.

There are so many great tips and tidbits on this site that it is hard to do it justice here. The site has everything from the planning process, to incorporating it into the curriculum, and how to maintain your garden and get the community engaged.

Of particular interest to those who are having a hard time getting "buy in" for the school garden, the website offers a guide to making the case for the garden, how gardening relates to National Science Standards, and a worksheet for drafting a proposal!

This website is a definite must read for teachers interested in starting a school garden!

Friday, September 25, 2009

Activity: Carrot Necklaces

Materials:
  • Carrots
  • Heavey thread
  • Darning needle
  • Knife
Activity:
  1. Wash the carrots and cut them into slices about 1/4 inch thick
  2. Thread your needle. The thread should be long enough to go around someone's head, plus a little extra.
  3. Push the carrot slices onto the thread by pushing the needle into the center of each slice.
  4. Once completed, lay your necklace on a piece of paper in a dark place to dry, making sure none of the carrots touch each other. As the carrots harden and dry, they turn into wrinkled beads. The dryin process takes about a week.
Work Cited:
Ocone, L with Pranis, E. (1983). The National Gardening Association Guide to Kids' Gardening: A complete guide for teachers, parents, and youth leaders. Wiley Science Editions: New York.

Tuesday, September 22, 2009

Secrets to Gardening with Children

    Below is a list of tips and suggestions for gardening with children. This list is taken from D. Landreth Seed Co.
    Visit their website for more information, including types of seeds and plants that work well for children's gardens.

  1. Always have something happening in the garden. Start with radishes and end with pumpkins.

  2. Choose easy to grow vegetables and flowers. Nothing succeeds like success.

  3. Choose each variety because there is something interesting about it, i.e. unusual size, unusual color, unusual shape.

  4. Choose vegetables and flowers with a story.

  5. Try not to plant mixes of colors. Groupings of specific colors are visually more intriguing to children.

  6. Tend the garden on a schedule, for example, every Saturday morning, every Sunday afternoon, or each Wednesday at 4: 00 PM.

  7. Teach children to weed by making weeding a fun game.

  8. Always let children do the watering--they love playing with the hose.

  9. Teach children proper garden preparation in the spring.

  10. Teach children to clean up the garden in the fall and use this as a time to plant flower bulbs and garlic and onion sets.

Copyright 2008 by The D. Landreth Seed Co., 60 East High Street, New Freedom, PA 17349, 800-654-2407. http://www.landrethseeds.com/.