Showing posts with label indoors. Show all posts

Tuesday, April 13, 2010

Activity: Growing Potatoes and Carrot Tops

Capture the interest and imagination of students by growing carrot tops and potatoes.


Materials
  • Toothpicks
  • Glass or plastic cup or saucer
  • Water
  • Sweet Potato or Carrot
  • Knife
  • Scissors
  • Pebbles or pea gravel
Carrots
  • Select a fresh carrot that still has the leaves on the top.
  • Cut the carrot so that about two inches remain below the top. 
  • Trim the leafy greens from the top of the carrot.
  • Fill a container with about one inch of pebbles or pea gravel.
  • Place the carrot tops, cut side down, in the gravel.  If necessary, add more gravel to hold the carrot tops in place.
  • Add water to the container.
  • Place the container in a sunny location.
  • Ask students to predict what will happen. 
    • Will a new carrot form? 
    • Will it grow? 
    • If so, how big will it get?
  • Observe the changes in your carrot.
  • Add water as necessary.
  • Although the carrot will not form a new root, after a few days leafy greens will start to appear.
Potato
  • Place four toothpicks around the middle of a potato.
  • Fill a cup with water.
  • Taking the potato with the toothpicks, rest the toothpicks on the edge of the cup.  The bottom of the potato should be sitting in the water.
  • Place the cup in a sunny location.
  • Ask students to predict what will happen. 
    • Will a new potato form? 
    • Will it grow?
    • If so, how big will it get?
  • Observe the changes in the potato.
  • Add water as necessary so that the bottom of the potato is in the water.
  • After a couple of days, roots will start to form in the water and stems and leaves will start to form.

Thursday, February 18, 2010

Activity: "Planting" an Indoor Garden

Even if you don't have the space available to start a school garden, you can still teach your students about fruits, vegetables, plants and gardening.

This easy activity allows you to "plant" a garden in your classroom and teach kids about various fruits and veggies.

Materials:
  • Clip art of fruits and vegetables on white paper for students to color
  • Coloring materials (markers, paint, crayons, etc.)
  • Scissors
  • Craft sticks
  • Glue
  • Container and potting soil or styrofoam to create "garden plot"
Preparation:
  • Find clip art of fruits and vegetables for students to color
  • Print pictures on white paper
Activity:
  1. Give each child one or several images of fruits or vegetables.
  2. Have the children identify the type of fruit/veggie and color it the appropriate color.
  3. Have children cut out the pictures and glue them to the craft sticks.
  4. Place the potting soil or styrofoam into the container.
  5. Have students "plant" their garden by placing their craft sticks into your "garden plot"
  6. Continue to have children identify the fruits/veggies in their garden.
Extension:
  • Have children use the fruits and vegetables from their garden as puppets. 
    • Have children create skits or plays with the puppets.
    • Read a garden story and have children hold up their fruit/veggie when it is mentioned in the story.
  • Use the pictures of the fruits and vegetables to help plan your school garden.  Have students decide where each one should go and place it into the "garden plot" accordingly.

Friday, January 15, 2010

Activity: Garden Patterns

The following website has some awesome resources and links for school gardens across the country.  In particular, it has a link for a fun and easy activity to do with your students.

The Garden Patterns Activity has students work with patterns.  The worksheet features a series of vegetables.  Students have to finish the pattern by drawing, naming or pasting the rest of the vegetables in the sequence.

Rather than reinventing the wheel, check out this awesome resource and easy activity to do with your students!

Thursday, January 7, 2010

Activity: Don't Forget Your Fruits and Vegetables!

This activity helps to teach and reinforce the parts of a plant (seeds, roots, stems, leaves, flowers and fruit). It also allows students to recognize the parts of a plant that we eat.

Materials:

  • A variety of fruits and vegetables to represent parts of the plant*
  • Table/Flat surface
  • Cloth


Activity:


  1. Place all of the fruits and vegetables on the table and tell students to gather around.
  2. Have students identify the names of the fruits and vegetables and the corresponding part of the plant they represent.
  3. Tell students they will have to remember the items on the table. Give students a couple of minutes to look at and remember the items.
  4. Cover the items with a cloth and carefully remove one or several items without the students seeing. Meanwhile, ask the students to explain the functions of the different plant parts or ask what plants need to grow.

    Seeds: Contain everything the plant needs to grow
    Roots:
    Anchor the plant, provide support, and absorb nutrients and water
    Stems: Carry nutrients from the roots to the leaves
    Leaves: Make food for the plant
    Flowers and Fruit:
    Help the plant reproduce

  5. After removing an item, uncover the fruits and vegetables and ask the students what's missing.
  6. Repeat as many times as desired!


Variation:
Play I Spy with the fruits and vegetables. Using the same idea, place items on the table and first have students identity the name of the fruit/vegetable and the part of the plant. Then students, "I spy with my little eyes....a root that is orange!" [Answer: Carrot]. Have students take turns picking the items.


*Suggested fruits/vegetables, according to plant part
  • Seeds:
    • Almonds
    • Brazil nuts
    • Cashews
    • Peas
    • Pumpkin seeds
    • Sunflower seeds
  • Roots
    • Beets
    • Carrots
    • Horseradish
    • Parsnip
    • Rutabagas
    • Sweet potatoes
    • Turnips
  • Stems
    • Asparagus
    • Garlic
    • Ginger
    • White potatoes
  • Leaves
    • Cabbage
    • Collards
    • Kale
    • Lettuce
    • Mustard
    • Parsley
    • Spinach
  • Flowers
    • Broccoli
    • Chive blossoms
    • Garlic blossoms
    • Squash blossoms
  • Fruits
    • Apples
    • Cucumbers
    • Grapes
    • Peaches
    • Pears
    • Peppers
    • Pumpkins
    • String beans
    • Tomatoes

Wednesday, December 30, 2009

Activity: Veg-Tea-Ble Party!

Instead of having a traditional tea party, invite your students to a Veg-tea-ble Party. Have students taste various fruits and vegetables or sample microgreens from your microfarm instead of snacking on cookies and crumpets.

You can set up the tables as you would a regular tea party. Invite students to get dressed up and bring a “guest” stuffed animal or toy. Make the Veg-tea-ble Party something special and out of the ordinary so that kids get excited about trying something new.

Encourage kids to try each fruit and vegetable. Remind them that they don’t have to like everything but they should at least taste it. Also remind students to be polite and not say “yuck” or other negative comments about the food. Tell them that the “chef” has worked hard to make these fruits and vegetables. Limiting the number of “yucks” also prevents students from discouraging each other from trying foods.

If you host your own Veg-tea-ble Party, we would love for you to share stories and your experiences!

Cheers!

Monday, December 21, 2009

Activity: Veggie Stamp Holiday Cards

Instead of using store bought holiday cards, consider having students make their own unique cards using fruits and vegetables.

Materials:
  • Paper
  • Tempera paints
  • Paper plates
  • Paint brushes
  • Knife
  • Various fruits and vegetables, such as potatoes, cucumbers, star fruit, apples, mushrooms, carrots, or broccoli.

Activity:

  1. Cut fruits and vegetables into manageable sizes for kids to use as stamps. If you're feeling creative, try carving shapes, such as stars, hearts or letters, out of the potatoes or other fruits and vegetables.

  2. Put tempera paint onto paper plates for each student.

  3. Instruct students to use the paint brushes to apply paint to the fruits and vegetables and then stamp them onto paper. Students can create collages or try to create a holiday scene for a holiday card.

  4. Don't forget to remind students to not snack on their stamps. ;)

  5. Let their artwork dry and then proudly display their work around the classroom or give as gifts!

(photo from http://whipup.net/2006/09/18/veggie-prints/)

Wednesday, December 2, 2009

Activity: How does your garden grow?

This sequencing activity allows children to imagine being a farmer or gardener. Children will practice following directions, putting items into a sequence or particular order, and using basic addition and subtraction.


Materials:
Worksheet containing images of four tomatoes, four ears of corn, four heads of lettuce and four carrots
Brown construction paper
Coloring supplies
Scissors

Activity:
  1. Give each student the vegetable worksheet, one piece of brown construction paper, coloring supplies and scissors.

  2. Have students color and cut out the pictures of the vegetables. Make sure that students color in the vegetables the appropriate colors.

  3. Explain to students that we will now plant our garden but we have to follow very specific instructions to make sure that everything grows.

  4. Tell students that the piece of brown construction paper is their garden. The side of the paper closest to them is the front of the garden and the edge of the paper that is furthest away from them is the back of the garden. (It may be useful to demonstrate this to students to avoid confusion)

  5. As you read each example to the class, have students arrange their vegetables in their garden. Tell students that they may need to rearrange or change their vegetables as each clue is given. Read each example two or three times so that students can check their work. You may need to do the first example together so students get an idea of what they are supposed to do.

    EXAMPLE ONE:
    The tomatoes get planted in the front row of the garden.
    The lettuce gets planted in a row behind the tomatoes.
    The corn gets planted in a row in front of the lettuce.
    The carrots get planted in the back row of the garden.


    EXAMPLE TWO:
    The corn gets planted in the front row of the garden.
    The tomatoes get planted in the back row of the garden.
    The lettuce gets planted in a row right behind the corn.
    The carrots get planted where you think they should go.


    EXAMPLE THREE:
    The yellow vegetable gets planted the back row of the garden.
    The red vegetable gets planted in a row right in front of the yellow vegetable.
    The green vegetable gets planted in the front row.
    The orange vegetable gets planted where you think it should go.


    EXAMPLE FOUR:
    The yellow vegetable gets planted in a row in the middle of the garden.
    The red vegetable gets planted in a row in front of the yellow vegetable.
    The green vegetable gets planted in the back row of the garden.
    The orange vegetable gets planted in the front row of the garden.


  6. After reading each example, review it together and show the correct arrangement of vegetables.

  7. After completing each example or after doing all of the examples, students will now "harvest" their vegetables. Read each "recipe" below and have students remove the appropriate number of vegetables from the garden and place them in an imaginary basket. You can follow up by asking students how many vegetables are left in the garden or row, how many vegetables did they pick from the garden, etc.

    RECIPE 1:
    Two heads of lettuce
    Three ears of corn
    One tomato
    One carrot

    RECIPE 2:
    Three ears of corn
    Four carrots
    Two heads of lettuce

    RECIPE 3:
    Two tomatoes
    Three carrots
    All of the lettuce
    One ear of corn

    RECIPE 4:
    One head of lettuce
    One tomato
    Two carrots
    Two ears of corn


Activity adapted from AIMS Education Foundation's "The McGregors' Garden" Activity

Tuesday, November 24, 2009

Activity: Estimating Tomato Seeds

Fresh fruits and vegetables can be excellent tools to teach basic math skills. In this activity, students will practice estimating, comparing and contrasting, and doing basic addition and subtraction.

Materials:

Cherry tomatoes (enough so each student gets ½ of a tomato)
Paper towels/napkins
Paper and pencils
One large tomato
A knife to cut food in half ahead of time

Activity:

  1. Explain to the students that today we are going to guess or estimate the number of seeds inside of a fruit or vegetable.

  2. Hand out ½ of a cherry tomato and paper towel/napkin to each student. Make sure that the students do not eat the tomato before completing the exercise.*

  3. Without actually counting the number of seeds, have students guess how many seeds are in their tomato half. Have them record the number on a piece of paper.

  4. Instruct students to count the seeds in their tomato.

  5. Have students record the actual number and figure out how close they were to their guess, allowing them to practice subtraction. Find out who was the closest.

  6. Have students compare the number of seeds in their tomato with a partner. Who has more seeds? How many seeds do they have all together?

  7. As a class, calculate the total number of seeds from all of the tomato halves. You can also calculate how many seeds one half of the room has compared to the other, how many seeds the girls had compared to the boys, etc. Each time students can either calculate the totals together as a class or do the addition on their own and then together as a class.

  8. Now ask students to guess how many seeds are in one large tomato. Record answers on the board or chart paper.

  9. Have students count the number of seeds in the tomato.

  10. Compare the number of seeds in the large tomato to the number of seeds in the cherry tomato halves and to the classes’ total number of cherry tomato seeds. Which has more?

Extension:

  • Do the same activity with a different fruit/vegetable (ex: pumpkins, apples, peppers, watermelon, etc.)

  • Have students calculate the mean (average), median (middle number), and mode (most frequent number) for the classes’ cherry tomato seeds
Note: Although student could eat their tomato halves, they probably shouldn’t since they will be playing with them and counting the number of seeds. It is probably best to advise your students that although tomatoes are a yummy snack, it is best that we don’t eat them after playing with them.

Monday, November 16, 2009

Grant Opportunity: Welch's Harvest Grant

Welch's and Scholastic will award two schools in every state with a customized indoor or outdoor garden package to teach children about nutrition and sustainable agriculture.

The awards are open to K-8 classrooms with a minimum of 15 students. The top five winners will receive a package valued at $1,000, the top 25 winners will receive a package valued at $500, and 70 winners will receive a package valued at $250. According to Welch's website, the award package includes garden tools, seeds and educational materials.

Remember that the White House's garden cost less than $200 to create. So no matter what, if you receive an award, you'll have enough to start a garden!

Applications must be submitted by February 6, 2010. Visit Welch's website for an application and additional information.

Friday, November 13, 2009

Students Write about their Microfarm

Students from Woodland Elementary School in Barron, WI have also been busy planting and harvesting a microfarm. Check out these adorable letters from the students describing their experiences.

Dear Mr. Wright,
Our class Micro Farm went great. We all loved watching
it grow. When they were finished growing, we got to eat them. My
favorite ones were the purple kohlrabis and the carrots. The one I did not like was the sunflowers. I got to plant the purple kohlrabis. I loved planting the purple kohlrabis. Thank you for inventing the Micro Farm.
Love,
Mackenzie


Dear Mr. Wright,
My class Micro Farm is going very well. We are harvesting around Oct. 21. We have purple kohlrabi, tenber green mustard, carrots, and sunflowers. One of the carrots was a foot taller then the other. The carrots were the last ones starting to grow. I can not wait until we harvest them. Thank you for giving us the farm.
Your friend,
Grace


Dear Mr. Wright,
Thank you for the micro-farm. It was fun watching the plant’s grow. My favorite was the purple kohlrabi. The sunflowers tasted funny. The tendergreen mustard and carrots tasted funny. It was fun to harvest the greens. I planted the sunflower. I planted the sunflowers with Walter and Kambria. We had it with ranch dressing.
Your friend,
Kiara

Wednesday, November 4, 2009

Day 7 of the Microfarm

And on the 7th day we had carrots!

It's hard to believe that just a week ago I planted the microfarm and now all of my microgreens have started sprouting.

The carrots were the last to sprout but they are working hard to make up for lost time.

Check out these photos:


(Close up of the carrots)


Yesterday I watered the beets, sunflowers and popcorn since the lids were removed and the potting medium started to dry out.

After removing the lid from the carrots, I will keep my eye on them and probably water the tray in the next few days.

Below, check out a few pictures of the entire microfarm.


More photos to come as the microfarm continues to grow. Plus find out what we do with our microgreens once they are ready to eat!

Thursday, October 29, 2009

Planting a Microfarm!

Today, I planted my very first microfarm!

What's a microfarm, you ask?
A microfarm is essentially a garden on a wagon. Trays of microgreens are planted and placed on the wagon, which has a lights to help the plants grow indoors.

Microfarms offer a solution to Wisconsin's short growing season and provide flexibility for teachers. Teachers are not limited by unpredictable weather. Instead they can decide when they want to plant the microgreens and create an entire gardening unit. Plus, the microgreens start to grow relatively quickly, which will help keep the interest of students.

Planting a microfarm is surprisingly easy.

Granted, when I planted by my mircofarm, the actual cart was already built. But the planting took no time at all.

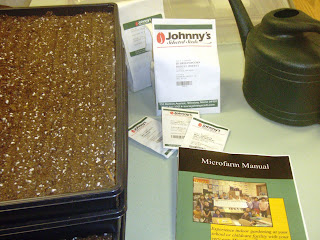
First, I gathered all of my tools (seen in the picture below).

(From the left: Trays filled with soilless potting medium, seeds, microfarm manual, and watering can)

The trays I used came with soilless potting medium already in it, which helped reduce the mess.

Once I scattered the seeds over the potting medium, I was concerned about covering them. I had a feeling I was about to make a huge mess and potting medium and seeds would be everywhere.

Here's an insiders tip: Use a pencil to help till the potting medium and to cover the seeds. Simply put a pencil into the medium and move it back and forth. It will help cover the seeds without making a mess. It is also something easy for kids to do!

I did this with four types of seeds, making a tray for each one.--See picture below


Don't forget to label your trays so you remember what you are actually growing in each tray.

Next I watered my trays of microgreens. I wasn't quite sure how much water to add since the potting medium seemed to soak it up relatively quickly. But I applied enough water to make it moist.

Then, I placed the trays onto the microfarm and covered them with plastic domes. The domes help to keep the moisture in so that you don't have to water the plants very often. Moisture will start to gather on the plastic domes, which indicates that I gave my microgreens enough water. The domes will stay on until the microgreens begin to grow.

Finally, I set the timer for the grow lights to be on for 16 hours and off for 8 hours.

Check out the finished product!


Now, its time to sit back and wait for my microgreens to start to sprout up.

I'll hopefully be able to report my success within a few days!
If you want to learn more, visit http://www.gotdirtwisconsin.org/ for a microfarm manual.