The stacks of spotless, crisp notebooks and bright back-to-school accessories are already greeting us at the entrance of stores. I don’t know what it is about school supplies that still draws me - my days of HAVING to have a 5-subject binder with a dreamy picture of Rick Springfield on the cover are long over!
I hope you’re not yet getting caught up in the back-to-school flurry, but rather still enjoying some quality time doing perhaps little more than skipping rocks, or maybe meditating on the slowly spreading ripple-effect of a pebble tossed in a pond. Only so many more days before that pond will freeze over!
I’ve been thinking about the “ripple effect” a lot as I’ve been talking to some of the teachers who are enthusiastic advocates for the Got Dirt? Program. One story in particular had me a little misty as I was swept up in her story of all the unexpected influences her simple garden project had. Here’s the short version – there were actually many more ripples!
An elementary teacher came back from a free workshop with the design plans for a Microfarm – basically a small, self-contained garden on wheels. She showed the plans to the father of a student who had been helping with some handy-work around the school, and his eyes lit up as he assured her “I can make that”. This parent happened to be between jobs, and while the project truly was a very easy one for someone of his skill - the opportunity to hear his kid tell classmates “my Dad built this” was just as empowering and rewarding as being the most popular parent on career day. Ripple: engaged and happy parent, one who happened to really need a boost.
The kids planted seeds for a variety of greens, which sprouted quickly and were ready to harvest in just a few weeks. Each student planted a recycled milk carton for themselves plus another for a friend. When it came time to make the harvest into a salad, the students invited their friends to join the feast, many of them other teachers and school support faculty. Who isn’t flattered by a lunch invitation? Ripple: The feeling of family across the whole school was enforced, and even school staff who might not feel like they have the same influence as teachers were honored to be picked as “friends”.
Seeing the impact this project had on the kids during the salad luncheon, several other teachers could see how easily the Microfarm could inject great hands-on enthusiasm into a multitude of lessons. The fact that it is portable and works quickly made it easy to arrange a schedule for multiple classrooms to use in turn. Ripple: that initial effort saved time and money in the future, and for more classrooms.
It keeps going! The health department recently contacted the original teacher to discuss whether the Got Dirt? Garden experience could be the foundation for the research piece of a grant they are pursuing to expand some school nutrition programs. It turned out to be just what they are looking for. Ripple: Wow, you can see how that ripple can grow and keep going!
So, I love to think of the Microfarm garden project as the little pebble that makes big ripples. When I start talking about classroom gardens, many seem to be intimidated by the big splash – the big boulder of a project like an outdoor raised bed complete with corn and compost bins and weeding schedules and … whew! Bigger projects are heavier lifting for sure, and they do make a splash that’s impossible to ignore … but don’t underestimate the power of the pebble.
Want to learn how? Give me a call at 920.391.4655 or email peters_lk@co.brown.wi.us. Or take a peek at the free instructions on building a Microfarm at http://www.co.brown.wi.us/i_brown/d/uw_extension/microfarm_manual.pdf.
Training sessions to help you decide what type of garden is right for you, and advice on how to get started are also FREE at training sessions across Wisconsin – find us on Facebook or Twitter for announcements as workshops are scheduled.
Showing posts with label microfarm. Show all posts
Showing posts with label microfarm. Show all posts
Monday, August 8, 2011


Thursday, December 2, 2010
Activities to Curb Cabin Fever
Now that winter is upon us, you may be thinking that there aren’t many plant activities that your students can participate in. However, there are lots of fun ideas to get students thinking about gardens, even when there’s snow on the ground.
Watch seeds sprout! Line a glass or plastic jar with a damp paper towel and insert several zucchini or lima bean seeds between the glass and the towel. Place a lid on the jar, leave it by a sunny spot and check the towel every day to make sure it’s still moist. Seeds should sprout in a few days.
Make your very own worm farm! Line a large cardboard box with a garbage bag. Fill it with soil, organic matter and a few warms. Keep it shady and moist, but not too wet. Add vegetable scraps to feed the worms. The worm farm will help teach students about the interdependence of plants and organisms as they watch the worms turn vegetable scraps into valuable compost.
Read a book! Telling a story about gardening to students during winter will get them excited for the growing (and eating) process later in the year.
Start a microfarm! You can grow microgreens (immature plants) for a tasty salad indoors all year long. The entire gardening process only takes about 3-4 weeks. For more information on building a microfarm, visit the Got Dirt? website at http://www.gotdirtwisconsin.org/.
Watch seeds sprout! Line a glass or plastic jar with a damp paper towel and insert several zucchini or lima bean seeds between the glass and the towel. Place a lid on the jar, leave it by a sunny spot and check the towel every day to make sure it’s still moist. Seeds should sprout in a few days.
Make your very own worm farm! Line a large cardboard box with a garbage bag. Fill it with soil, organic matter and a few warms. Keep it shady and moist, but not too wet. Add vegetable scraps to feed the worms. The worm farm will help teach students about the interdependence of plants and organisms as they watch the worms turn vegetable scraps into valuable compost.
Read a book! Telling a story about gardening to students during winter will get them excited for the growing (and eating) process later in the year.
Start a microfarm! You can grow microgreens (immature plants) for a tasty salad indoors all year long. The entire gardening process only takes about 3-4 weeks. For more information on building a microfarm, visit the Got Dirt? website at http://www.gotdirtwisconsin.org/.
Wednesday, June 2, 2010
Photos: Hayward Primary School's Microfarm
Second grade students at Hayward Primary School in Hayward Wisconsin have been busy working on their school garden. After receiving a Got Dirt? grant, they created a Microfarm to help grow plants in their classroom. Check out their fabulous work!


Planting the Microfarm trays

Plants growing in the Microfarm

Learning how to transplant


Learning the parts of a plant


Thumbs Up for Vegetables!

Thursday, April 22, 2010
Dear Gardening Friends: Letters from Students
Who says that gardens don't have an impact on students? Check out these adorable letters I received from a class that just planted a Microfarm. Not only are the letters cute, but they show just one way for students to practice spelling and writing.


"Dear Gardening Friends,
Thank you for donating stuf
for the garden. We are
planting, radish, lettuce,
pepper, tomatoes. Our group
planted tomatoes. Have a
very happy spring.
Your friend Addy"

"Dear Gardening friends,
Thank you for helping with our
microfarm. We planted some
veggies. My group planted red
lettuce and green lettuce.
Yours
truely Ike"

"Dear Gardening friends,
We planted a microfarm.
Thank you for the money
to get us started. We
planted Pepper, lettuce,
radish, tomato, and spinich
seeds.
From,
Jackson"

"Dear Gardening friends,
Thank you! Do you have a
garden? I do. The pumpkins
usually take over :) What do
you plant in your garden?
Your friend,
Nel"

"Dear Gardening friends,
Thank you. We planted raddish,
lettuce, pepper, tomato, spinach.
There are 3 radish sprouts
in the plastic tray.
Have a nice summer.
Love,
Love,
Taylor"

"Dear Gardening friends,
Thank you for stuf for our
garden. We plated some red
lettuce and some lettuce in
our room. It is a lot of
fun. You would love it. I
can't wait to harvest the plants.
From Jake"
Friday, November 13, 2009
Students Write about their Microfarm
Students from Woodland Elementary School in Barron, WI have also been busy planting and harvesting a microfarm. Check out these adorable letters from the students describing their experiences.


Dear Mr. Wright,
Our class Micro Farm went great. We all loved watching
it grow. When they were finished growing, we got to eat them. My
favorite ones were the purple kohlrabis and the carrots. The one I did not like was the sunflowers. I got to plant the purple kohlrabis. I loved planting the purple kohlrabis. Thank you for inventing the Micro Farm.
Love,
Mackenzie
Dear Mr. Wright,
My class Micro Farm is going very well. We are harvesting around Oct. 21. We have purple kohlrabi, tenber green mustard, carrots, and sunflowers. One of the carrots was a foot taller then the other. The carrots were the last ones starting to grow. I can not wait until we harvest them. Thank you for giving us the farm.
Your friend,
Grace
Dear Mr. Wright,
Thank you for the micro-farm. It was fun watching the plant’s grow. My favorite was the purple kohlrabi. The sunflowers tasted funny. The tendergreen mustard and carrots tasted funny. It was fun to harvest the greens. I planted the sunflower. I planted the sunflowers with Walter and Kambria. We had it with ranch dressing.
Your friend,
Kiara
Tuesday, November 10, 2009
Sampling the first microfarm harvest
Last night, I tried the first of the microgreens from the microfarm.
I decided to first taste each microgreen individually, which I am told is similar to how teachers have their students sample the microgreens. Plus, I figured that before I took a leap of faith and incorporated them into a salad, I would first see how they tasted by themselves.
Again, I must admit, I was nervous about trying the microgreens. They bear a strong resemblance to grass clippings. Plus, I've never considered eating sunflowers or hybrid popcorn before, so I was completely clueless how there would taste.
First up: Sunflowers. After a slight hesitation, down the hatch it went. I was pleasantly surprised. The sunflowers tasted similar to other salad greens and reminded me of something I might get in a restaurant.
Not too bad!
Next up: Hybrid popcorn. I must admit, I did not like the hybrid popcorn as much as the sunflowers. I thought that something about the texture and almost chewiness of the hybrid popcorn was not appealing. However, that does not mean I will totally give up on it. I plan on incorporating them into a salad. Although I may not like how they taste on their own, they may work well when mixed in a salad with other greens.
So my microfarm journey continues. I'm looking forward to harvesting the carrots since I am told the greens taste just like regular carrots!
I decided to first taste each microgreen individually, which I am told is similar to how teachers have their students sample the microgreens. Plus, I figured that before I took a leap of faith and incorporated them into a salad, I would first see how they tasted by themselves.
Again, I must admit, I was nervous about trying the microgreens. They bear a strong resemblance to grass clippings. Plus, I've never considered eating sunflowers or hybrid popcorn before, so I was completely clueless how there would taste.
First up: Sunflowers. After a slight hesitation, down the hatch it went. I was pleasantly surprised. The sunflowers tasted similar to other salad greens and reminded me of something I might get in a restaurant.
Not too bad!
Next up: Hybrid popcorn. I must admit, I did not like the hybrid popcorn as much as the sunflowers. I thought that something about the texture and almost chewiness of the hybrid popcorn was not appealing. However, that does not mean I will totally give up on it. I plan on incorporating them into a salad. Although I may not like how they taste on their own, they may work well when mixed in a salad with other greens.
So my microfarm journey continues. I'm looking forward to harvesting the carrots since I am told the greens taste just like regular carrots!
Monday, November 9, 2009
The first harvest from the microfarm
After planting my first microfarm less than two weeks ago, it is time to start harvesting!
The sunflowers and hybrid popcorn were the first microgreens harvested.
Harvesting was incredibly easy and a lot of fun. It was like giving my microgreens a haircut. Using a pair of scissors, I trimmed the tops of the plants, leaving a small shoot behind. As I harvested the plants, I could imagine a group of young students eagerly awaiting their turn to harvest their crops.
The sunflowers and hybrid popcorn were the first microgreens harvested.
Harvesting was incredibly easy and a lot of fun. It was like giving my microgreens a haircut. Using a pair of scissors, I trimmed the tops of the plants, leaving a small shoot behind. As I harvested the plants, I could imagine a group of young students eagerly awaiting their turn to harvest their crops.

(Above: Before harvesting)

(Above: Harvesting)

(Above: [Left] Sunflowers; [Right] Hybrid Popcorn)
Tonight I'll try the microgreens in a salad. I'm a little nervous about trying the microgreens since the sunflowers look similar to clovers and the hybrid popcorns bare a strong resemblance to grass clippings. As I write this, though, I can hear my parents’ oft-repeated phrase while I was growing up: "If you haven't tried it, you can't say you don't like it."

(Above: Close up of Sunflowers)

(Above: Close up of Hybrid Popcorn)
So I guess it's a hybrid popcorn and sunflower salad for me tonight!
Friday, November 6, 2009
Day 9 of the Microfarm
The microfarm continues to do well. The beets are not nearly as full as the other microgreens. I hope that I planted enough seeds and planted them deep enough into the potting medium.
Check out these updated photos:


Next week I'm hoping to actually sample some of the microgreens. I am told that the tops of the carrots taste just like regular carrots. Stay tuned!
Wednesday, November 4, 2009
Day 7 of the Microfarm
And on the 7th day we had carrots!
It's hard to believe that just a week ago I planted the microfarm and now all of my microgreens have started sprouting.
The carrots were the last to sprout but they are working hard to make up for lost time.
Check out these photos:
It's hard to believe that just a week ago I planted the microfarm and now all of my microgreens have started sprouting.
The carrots were the last to sprout but they are working hard to make up for lost time.
Check out these photos:


(Close up of the carrots)
Yesterday I watered the beets, sunflowers and popcorn since the lids were removed and the potting medium started to dry out.
After removing the lid from the carrots, I will keep my eye on them and probably water the tray in the next few days.
Below, check out a few pictures of the entire microfarm.


More photos to come as the microfarm continues to grow. Plus find out what we do with our microgreens once they are ready to eat!
Monday, November 2, 2009
Day 5 of the Microfarm
When I left work on Friday, I did not anticipate much change to take place in my microfarm over the weekend.
Boy was I wrong!
When I checked the microfarm today, I was shocked by the amount of growth that occurred.
Boy was I wrong!
When I checked the microfarm today, I was shocked by the amount of growth that occurred.

The sunflowers and hybrid popcorn had the most dramatic progress. I removed the plastic lids from the sunflower and hybrid popcorn trays since they have started to grow. [You typically remove the lids when about half the tray is filled with growth.]

(Sunflower shoots. If you look closely, you can see the shell of the sunflower seeds still attached to some of the spouts.)

(Hybrid popcorn starting to grow. It is almost as tall as the plastic cover.)
Meanwhile, the beets are starting to make some nice progress. I removed the plastic lid from the beets since there is too much moisture, which is starting to produce some "fuzzy" plants.


(If you look closely, you can see the start of some potential fungal problems in the beet tray.)
The carrots will take a little longer to grow. Small green shoots have started to sprout up but not enough to warrant removing the plastic cover.

(Tiny carrot sprouts starting to grow.)
I am amazed at how quickly plants grow in the microfarm. It is definitely something that will capture the interest of children, who might normally be impatient when growing a traditional outdoor garden.
Over the next few days, I will continue to monitor the microfarm’s progress. I will need to water the trays without the plastic lids a couple of times throughout the week since they no longer have anything to capture moisture. The humidity within the building will dictate how often the plants must be watered.
Stay tuned! More pictures to come later this week!
Friday, October 30, 2009
Day 2 of the Microfarm
Yesterday, I planted seeds in my microfarm. Not that I was honestly expected the plants to shoot up over night, it is still fun to check the progress of my handiwork.
The pictures below show the condensation that is starting to form on the plastic trays, which indicates that they have enough water.
The pictures below show the condensation that is starting to form on the plastic trays, which indicates that they have enough water.


Stay tuned for the progress of the microfarm as I anxiously wait for my microgreens to start sprouting!
Thursday, October 29, 2009
Planting a Microfarm!
Today, I planted my very first microfarm!
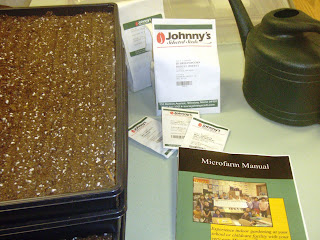 (From the left: Trays filled with soilless potting medium, seeds, microfarm manual, and watering can)


What's a microfarm, you ask?
A microfarm is essentially a garden on a wagon. Trays of microgreens are planted and placed on the wagon, which has a lights to help the plants grow indoors.
Microfarms offer a solution to Wisconsin's short growing season and provide flexibility for teachers. Teachers are not limited by unpredictable weather. Instead they can decide when they want to plant the microgreens and create an entire gardening unit. Plus, the microgreens start to grow relatively quickly, which will help keep the interest of students.
Planting a microfarm is surprisingly easy.
Granted, when I planted by my mircofarm, the actual cart was already built. But the planting took no time at all.
First, I gathered all of my tools (seen in the picture below).
(From the left: Trays filled with soilless potting medium, seeds, microfarm manual, and watering can)The trays I used came with soilless potting medium already in it, which helped reduce the mess.
Once I scattered the seeds over the potting medium, I was concerned about covering them. I had a feeling I was about to make a huge mess and potting medium and seeds would be everywhere.
Here's an insiders tip: Use a pencil to help till the potting medium and to cover the seeds. Simply put a pencil into the medium and move it back and forth. It will help cover the seeds without making a mess. It is also something easy for kids to do!
I did this with four types of seeds, making a tray for each one.--See picture below
Don't forget to label your trays so you remember what you are actually growing in each tray.
Next I watered my trays of microgreens. I wasn't quite sure how much water to add since the potting medium seemed to soak it up relatively quickly. But I applied enough water to make it moist.
Then, I placed the trays onto the microfarm and covered them with plastic domes. The domes help to keep the moisture in so that you don't have to water the plants very often. Moisture will start to gather on the plastic domes, which indicates that I gave my microgreens enough water. The domes will stay on until the microgreens begin to grow.
Finally, I set the timer for the grow lights to be on for 16 hours and off for 8 hours.
Check out the finished product!
Now, its time to sit back and wait for my microgreens to start to sprout up.
I'll hopefully be able to report my success within a few days!
If you want to learn more, visit http://www.gotdirtwisconsin.org/ for a microfarm manual.
Subscribe to:
Posts (Atom)

 Posts
Posts

